
A magazine where the digital world meets the real world.
On the web
- Home
- Browse by date
- Browse by topic
- Enter the maze
- Follow our blog
- Follow us on Twitter
- Resources for teachers
- Subscribe
In print
What is cs4fn?
- About us
- Contact us
- Partners
- Privacy and cookies
- Copyright and contributions
- Links to other fun sites
- Complete our questionnaire, give us feedback
Search:
Creating a vanishing creature puzzle
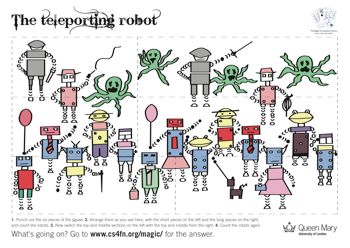
It's all well and good to have a neat trick to puzzle your friends with. It's even neater to be able to draw your own as I did with the teleporting robot. Once you've worked out what is going on you could try draw your own by trial and error matching up robot bits (and I suspect vast amounts of patience to get it to work). Of course I'm a Computer Scientist so I didn't just want to draw one once, I wanted to REALLY solve the puzzle. I wanted to work out a precise method for drawing this kind of puzzle so that once I'd worked it out I could do it over and over with different pictures.
To do that I had to first of all work out the principles underlying how it worked but I then had to apply those principles and work out an algorithm that leads to the creation of a new puzzle in a principled way.
Before you read on, you might want to have a go at solving it yourself. See if you can draw a picture - with mermaids say instead of robots - that works. On top of that make sure you understand what you did well enough so you can draw a second one with out much thought.
Budding programmers go through similar stages. First you just want to use cool techy stuff and show them off. Then you start to think, well why don't I try to work out how to create this stuff myself - you teach yourself to program. To become a maestro though you don't want to just hack up programs by trial and error, but engineer them in a principled way that you know you will get results.
Here is the method I came up with to make drawing new versions of the puzzle easy. This is just for a two piece jigsaw.
1. Draw out the outline of the board and pieces
Take an A3 piece of paper and draw a light horizontal line across the page 100 mm from the bottom. Draw a second horizontal line across the page 100 mm further up. That will be the top of the jigsaw. Now draw a vertical line 390 mm from the left edge of the paper. It will be the right hand edge of the puzzle. Now draw a vertical line from the bottom of the page to the first horizontal line 210 mm from the left edge. It will be the join between the bottom two pieces. Finally draw a second vertical line from the middle line up to the top one 150 mm from the left edge, to be join between the top two pieces. Once you've drawn the creatures it should fall exactly halfway between two of them
2. Marks equal positions for the creatures
First, it's important to realise that when you swap the pieces over, the top of each creature joins up with the bottom of a different one. If the creatures are going to do that then their positions have to match exactly after the move. How can we make that happen? Well the easiest way is to equally space them across the page. You could do it with a different number of characters but let's do it exactly as the vanishing robot. It turns out its easier to start just by drawing lines rather than characters. Get one line to disappear when you swap the pieces and you know the rest will work. This is a common tactic when programming - solve a simpler problem first and test it works, before modifying it to do something more complex. Then if it doesn't work at the end, you know it was the later changes that caused the problem.
Measure off 15mm from the edge and draw a short mark across the line. Now draw marks every 30mm from there so that you have 13 marks across the page. Those will be the positions of your 13 characters. (In the teleporting robot we had 4 more in an extra top row to make the full 17).
3. Draw vertical lines in the creature positions
Now draw vertical lines at each of those points. All will be 60mm long but positioned at different vertical positions as well as horizontal ones. Draw the first one 60mm high completely below the mid-line and touching it.
When we swap the pieces over, that first creature will jump 5 places to position 6. So count on 5 of your dashes to get to the next position. Draw a line there again 60mm high, but this time place it so that 5mm of it is above the mid-line and the other 55 mm below. Move on 5 positions again for the next line. Make it poke above the line by 10mm. Move to the next line, 5 positions on and this time draw the line poking up by 15mm and so on. When you get to the last point just carry on counting back from start. Keep going until all 17 lines are drawn at which point you should be back to the first.
4. Cut out the top two pieces
Now to make the drawing of creatures easier and test what you've done so far, cut out the top two pieces, leaving the bottom two alone for now. Try swapping the top two pieces over. If they don't line up you didn't draw it properly! If you did it right one of the lines should disappear leaving only 16. Where did it go?
5. Draw the characters over the vertical lines.
You can now draw the creatures, using the vertical lines as a guide. It's not quite as simple as just drawing them though. You need to make each half match two other body halves. We cut the top two pieces out to make doing this easier.
Start with the left most creature. In some ways this is the hardest. You need to draw it so it works as a whole figure both with a thin slice at the top of its head is there and when it is missing. Draw just a head below the line. Draw nothing above the line. Now swap the top two pieces making sure all the 60mm vertical lines match exactly. Draw an extra bit of head on top of the existing head in a way that still looks ok. Now fill in the rest of the body. It won't matter what it looks like.
Now swap the top pieces back, again lining up the 60mm vertical lines exactly. You have a whole creature in position 1 and a top of head in position 6. Draw the rest of the head and body below that lone top of head.
Swap the pieces back. You now have a bottom part of a creature missing the top of its head. Draw on a head and swap back.
Keep doing this: drawing a top or bottom onto the part just drawn and then swapping the top two pieces. This will make sure everything matches in both versions of the drawings. As the vertical lines gradually rise above the line, the break point will gradually drop down the body. That means you will be drawing half a body then part legs rather than half a head as you work through the drawings.
The secret is just to make the parts crossing the lines match. Make sure you don't draw anything extra that crosses from the bottom pieces to the top ones as it won't match the figure already drawn (and there lies madness I promise!) Otherwise you can draw whatever you like above and below the lines to make the drawing interesting.